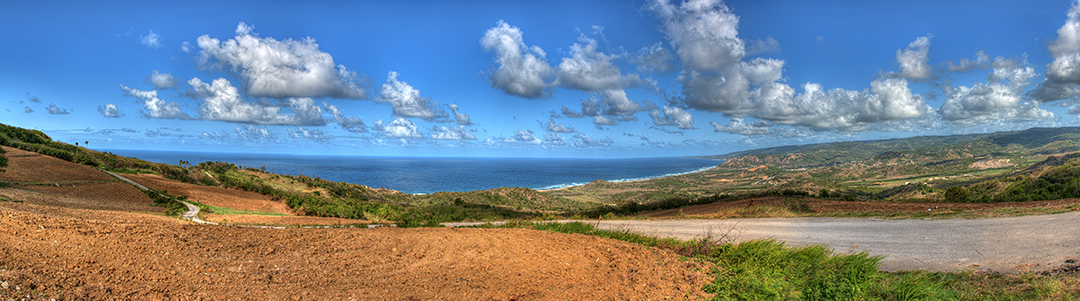
Taking a panoramic photograph can sometimes feel like a big task if it is your first time trying, but once you start, you will find it is easier than you may have imagined. Here are a few tips on how to make life easier when taking your first panorama.
See the shot before you take the shot. Before you start, it is a good idea to assess the scene you are about to capture. What do you want to include and conversely what do you want to leave out, while you may be able to cut out the excess image you can not bring back what you never shot.
Get the safe shot then experiment. As with most photography, just taking the obvious shot will look alright and it is always advised to get that shot, however, if you want your photo to stand out among others try to find another angle, change vantage points to show a different perspective, experiment with exposures. Try to find a way to make that final image uniquely yours.
Mark the start and stop of your panorama while shooting. Quite often when shooting to develop a panoramic photo we can often find something on site that we want a single photo of, while this is normal, when going through your thumbnails looking for your photos to compile it can be difficult to detect where your photos start and end for your panorama. I suggest take a ‘marker’ photo at the start and finish, I usually use a photo of my hand just before I start and one at the end so that as I look at the thumbnails I can easily tell that everything between the hands is for a panorama. This technique also works with HDR images.
Try not to use too wide a lens. While a wider lens can mean capturing more area per photo thereby reducing the number of photos you have to take, wider lenses can introduce distortion issues. Though lens correction can fix distortion, it can also mean parts of your images can be cropped out. Meaning you might end up with images that don’t properly overlap.
Before stitching use lens correction. Depending on your lens/camera combination you might get distortion and vignette in your image and it would be wise to correct these issues so that your software can properly line up the features for stitching.
Overlap about one-third of the image. This is a personal preference, some people may prefer a slightly shallower overlap, I use this much to ensure that distortion, or cropping resulting from distortion correction, does not eliminate enough of the overlapping features that make it difficult for the software to easily put the images together.
Too much zoom means more images to take. While I try to get away from a lens that is too wide, to limit distortion, it is slightly counterproductive to have to take too many images, not only will it work your computer’s processer harder working on so many images, your final product will be super large.
Set your focus and let it stay constant. Refocusing each time you take a shot may cause your focal plane to shift and if two things are equidistant from the camera but one is in focus and the other is not it could cause the image to ‘feel off’. I will usually focus first, then set my focus to manual before starting to shoot the panorama. You can also set your aperture to a small setting to ensure a maximum focal range, just be careful and test your lens first some lenses make softer images if their aperture is too small.
Take your exposure off auto. Set your exposure then leave those settings, if your exposure changes between shots your transitions (from image to image) may not look smooth. Try to take a test shot of the brightest area and darkest area to ensure that everything can be captured at one steady exposure.
If you must edit exposure, shadows, or highlights globally (not just to fix a small piece) in one of the photos of a panorama, then make that edit in all the images of that panorama or they might not blend well. Assuming you kept the exposure consistent while shooting.
Camera orientation, portrait vs landscape. If I am shooting a wide panorama I will generally rotate my camera and shoot in portrait orientation. This gives me more room above and below my intended scene ensuring I don’t have to do a second sweep, though this is not always the case sometimes you have to do a second row.
That is it for now, if you would like to know more or you would like to add to the topic email me at info@artwithcameras.com or message me from our Contact Page.